Creating Videos for Learning


I’m up to Thing 19 of 23 now! This week I’m blogging about how I use videos in my flipped classroom. As I’ve previously described, my senior Classics classes are flipped through iBooks and iTunes U. For each segment of content, I’ve filmed a short video tutorial by recording myself speaking over a Keynote. I also provide a page of notes, which is more or less a transcript of the video, for those who would prefer to read the information. When surveying the students I’ve found that about half prefer the videos and half the written notes, so I’m happy to continue providing this choice. 

My Keynote videos aren’t particularly exciting (I’ve tried to make them more engaging with images) but I think they convey the information they need to clearly, and are quite straightforward to create using my laptop and ​a simple USB microphone. Here’s an example about the Nature of Roman Religion, which I use in my Y12 Classical Studies class. I upload the videos privately to Youtube and the students watch them through a widget in their iBooks. At the beginning and end of each video I also remind the students of the key questions they need to answer, to help guide their note-taking.

​​

​I’ve also experimented with a number of other apps and tools. I’ve previously mentioned Adobe Spark Video, which I love getting the students to use. ​It’s a really great way to quickly make a really professional looking short video. Here’s an example I made to give students a basic overview to the city of Athens (excuse my super Kuwi accunt, it sounds particularly strong in this video!).

Another app I really like, but have yet to master, is Explain Everything. My iPad handwriting is still pretty messy but I’ve been experimenting with it to make tutorials on grammatical concepts for my junior language students. It’s quite effective in its simplicity, and I want to continue improving my abilities so that I can create more flipped content for my junior students. 

I’ve also made brief forays into iMovie, to try and make more ‘visual’ videos which combine images and videos from different sources. My students seem far more talented at this than I am and I want to get them creating more of their own content next year. As Thing 19 said, making an effective video actually requires a lot of thinking and decision-making. This year I’ve found my senior students quite reluctant to look beyond just submitting work in a written format, so next year I want to push them to demonstrate their learning more creatively. I plan to encourage them by removing this default option, so that creating their own audio and visuals becomes more natural. And here’s an iMovie I made about the House of the Faun which I’ll use to show them anyone can do it…


How do you use video in your flipped classroom?

Insights into Learning

Thing 18 had some really useful food for thought about how to use technology to provide insights into learning. As a relatively new teacher, I’m constantly trying to figure out how I can better shape my teaching to help my students’ learning. I like to use Google Forms for surveys, and I’ve previously posted about how I use iTunes U and PDF Expert to give my students formal feedback on their writing.

Today I thought I’d mix it up a bit by talking about three games which I use for informal feedback on learning: Kahoot, Quizlet Live and SMART Technologies’ Monster Quiz.

Kahoot


I think a lot of people will already know about this quick and easy way to play multi choice quizzes in class, so here is a brief summary of the advantages and disadvantages, as far as I can see them.

Advantages: very quick and simple to set up, heaps of content has already been created (no wheel reinvention required), very engaging for students, can discuss answers to overcome common difficulties and download results for further analysis.

Disadvantages: can get unruly (noise and inappropriate nicknames!), tends to reward speed rather than accuracy (although streak bonuses are helpful), students need to be calmed and paused to review questions for maximum usefulness.

Quizlet Live


I only just got on to Quizlet Live this year (I’ve already used Quizlet quite a bit) and have really enjoyed playing it with my students. It’s a team game where students have to match terms and definitions across multiple devices. They race to earn 12 points, but lose them all if they make a mistake.

Advantages: quick and simple to set up, lots of pre-existing content, encourages collaboration, students are rewarded for accuracy and definitely take more time in answering, students focus on their devices so it doesn’t get too rowdy, can go over results with class at end of game.

Disadvantages: if one student’s device drops out it can ruin things for the team, one student can take devices for him/herself and let teammates just sit there.

Monster Quiz


This is a fun little game included on the software for my smartboard. You need to create a set of multi choice questions, which the students then race to answer in groups on individual devices. Each question answered helps to hatch a monster, and the first group to have all members answer their ten questions wins.

Advantages: fun music and graphics to engage the students, encourages collaboration and teamwork, and my Y9 boys LOVED it (they stayed after school on Friday afternoon to play another game!), results and data is presented at the end so you can go over the answers.

Disadvantages: have to create all the content yourself, and, as for Quizlet Live, sometimes students can take over their teammates’ iPads if they’re not going fast enough! (But they are kept occupied on their own devices until they’ve answered their questions, so at least everyone gets a chance…)

It’s hard to pick a favourite of all of these tools but I think having a variety is quite good – it stops the students from getting bored and keeps them on their toes! I tend to use Kahoot for quick individual reviews at the beginning/end of a lesson, Quizlet Live for introducing/reinforcing vocabulary or concepts over a longer period (going through a list several times until the students’ accuracy improves, and I save the Monster Quiz, being a bit more time consuming to set up, for its novelty factor.

Answer Garden also looks like a really cool tool – unfortunately all my students are off doing exams so I couldn’t try it out with them! I’d love for readers to be my guinea pigs instead; tap here to tell me what you think of my blog. 

Organisers for Thinking


This week I’ve been thinking about digital tools to use to help organise my students’ thinking, which has been an interesting topic. A lot of students, when asked to plan or brainstorm, still like using pen and paper. I know I tend to write myself little notes, or plan out things, using bits of paper and post-it notes (the more colourful the better!) but this is often a temporary and messy solution. While it’s a good first step, you then need to either take a photo of your thoughts with your device or transfer them to another digital place for safe-keeping. Ideally anyway – you should see my desk…

To quickly share ideas I quite like using Padlet or SMART Technology’s Shout It Out feature on my Smartboard. They’re a great way to hear from all students, and they last longer than sticky notes! They don’t always work reliably but they have proved useful tools. 

For individual brainstorming, I’ve recently discovered MindNode which is a very handy app for mind-mapping. I like the colour coding and the fact that you can add images, which has been really useful for the more visual art and architecture topics in Classics. Here is a brainstorm I made about what I’ve learned from 23 Teaching Things:

I’ve also been experimenting with sketch noting as a way of making sense of content.  Having a blank canvas really forces you to make your own connections, and using colour and illustrations is a good way to get different parts of the brain firing. I’ve also found it a good way to maintain focus during meeting and lectures, rather than getting distracted by emails and other notifications. It’s something I’d like to play around with next year in my classes as I think it will really help some students. I’m also keen to see what they can do, as it’s surely better than my efforts! See example below…


Have you used sketchnoting with your students? What is the best way to help them benefit from thinking more visually?

Innovative Learning Environments

Thing 16 showed me some new ideas about innovative, flexible and modern learning environments. This has been something I’ve thought about over the past year as I’ve tried to create a space that allows me to teach in the way I want to, taking advantage of modern technologies and pedagogies.

To work effectively in an ILE, I think a teacher needs to have:

  1. Flexibility – so that he/she is able to adapt to the needs of the students, task and content, and is willing to make changes when necessary.
  2. Confidence – (perhaps the new teacher in me!) so that he/she is able to let go of control, step away from the front of the class and allow his/her students to take risks and try new things.
  3. Creativity – so that he/she is able to find solutions to problems and create new ways to help the students’ learning, taking advantage of the resources available to him/her.
  4. Curiosity – so that he/she is able to encourage this mindset in students, teaching them that it is ok not to know all the answers and that finding them is how we learn.
  5. Expertise – so that he/she can hit the sweet spot of TPaCK (technological, pedagogical and content knowledge), helping his/her learners to extend their understanding of a topic using appropriate technology and pedagogy.

I was lucky enough to upgrade my classroom desks this year to create a more flexible learning environment. I wanted classroom furniture which would allow my students to work effectively in a range of settings and tasks. While my juniors often work in groups, my seniors really enjoy whole (small) class discussion, but also need to break away for group, pair and individual work. I came across Furnware’s slice tables and was able to trade in my traditional desks for these cool “pizza” ones!

Although they take a bit of time to set up, the tables (see picture above) are very light and manoeuvrable and fit into a range of configurations – even single seating for tests! My classroom still feels quite cluttered, but the word is that we will have smaller junior classes next year. Hopefully this happen and I am able to remove some desks to create more space. This will also make it easier for the students to drag the desks around and set them up themselves. I’ve also found that the students really don’t like facing away from the board, even if I’m only using it for a few minutes at the start. I’ve requested swivel chairs next year which will hopefully help me to take advantage of the situation. I’m very fortunate to work exclusively in one classroom so can set it up how I like it, but I know the new, constantly-changing desks haven’t always been easy for itinerant teachers (and some students).

With an unlimited budget, I’d love to replace some of my shelving around the walls with whiteboards for groups to write on, as well as bring in some more comfortable furniture for when students need to read or watch something. I think having a “different” space does help students to learn in a different, less traditional way, but I do need to keep challenging myself to think outside the box and step away from the front of the room.

Have you tried to create a more flexible space in a traditional senior classroom? How has it worked?

Collaboration using Minecraft


After reading the information on Thing 15 and learning about collaborative learning, the immediate thought to spring to my mind was a recent project my Y9 Latin class completed using Minecraft. I’ve never seen such effective and productive group work from students, and I was able to take a step back and just enjoy watching it happen!

I would like to preface this post by saying that I know very little about Minecraft. I’ve downloaded the app and tried to have a play, but I don’t quite “get” it. When I showed my software engineer brother what the boys had done he got very excited, so I need to line up a lesson with him! I saw it in action briefly last year when my French class built towns to describe and navigate in, but I think they focussed far more on the Minecraft than the French.

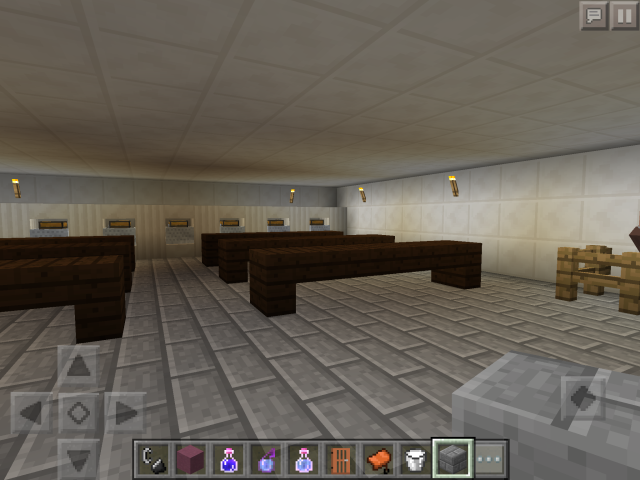
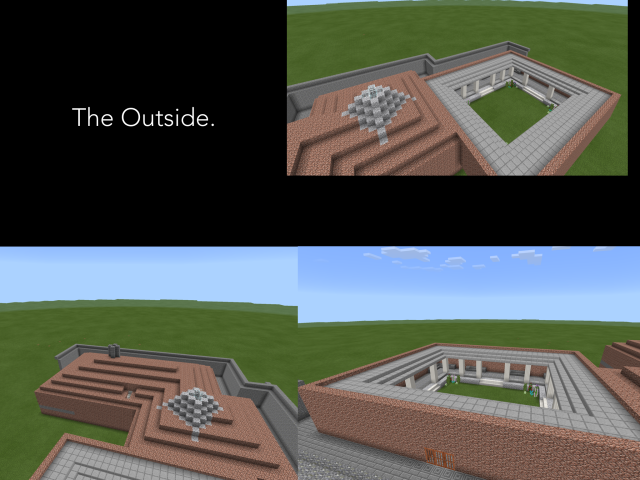
We had been learning about the baths at Pompeii and I wanted a way for the boys to gain a deeper understanding of how the baths worked, technically and socially. When I suggested they build the Forum Baths using Minecraft and asked if any of them used it, I had one boy (largely silent up until this lesson!) practically jump out of his seat to show me how it might be done. The rest of the class was very enthusiastic and so we dedicated a couple of lessons to recreating Pompeii’s Forum Baths.

This was the most autonomous I’ve seen my Y9 class and it really was fun to wander round, watching and listening and asking them what they were doing. I don’t think I provided enough guidance (some were drifting a bit far from the brief and inventing rather than recreating), but a bit of gentle prodding helped to keep them on track. All by themselves, the boys got themselves into groups, helped those who didn’t understand Minecraft to get started, and somehow managed to create this very complex building together. They were able to problem-solve by themselves and I didn’t need to intervene much at all.

At the end of these lessons they presented their group’s creation to the rest of the class, and graded each other on categories like attention to detail, historical accuracy and creativity. It was a really fun process and they were able to justify all of the decisions they made. It was also nice to see the quieter members of the class taking a starring role and lead the less experienced members of their group!

Here are a few examples of what they did. This is Team Technical Difficulties:


And here is Team JOSO’s creation:


It will be interesting to see how this transfers to their exam in a few weeks’ time, where they will need to explain about how the baths went and what a typical visit there might involve. The boys commented that this project really made them think about what the baths might have looked like and worked like, and that it made the concepts more memorable to them.

From the feedback they gave me, there was one overwhelming negative – which, unfortunately, is the opposite of collaboration! As I found out, each “world” can have up to five players working on it at a time, all connected to the same wifi. The downside to this is that others can get in if the group has less than five players and do what they want. In our case, that involved blowing things up. I like to think that these intruders were off-task students in nearby classrooms rather than destructive influences in my own one, but it was certainly terrible to see students lose hours worth of hard work in a few minutes to some nasty individual!

Despite this, I think the positives outweigh this one negative aspect and I’m keen to learn more about Minecraft so that I can do more of these sorts of projects. Are there any experts out there with any suggestions for me?